The full title of this section might be “Who’s afraid of peeling the opponent?” Keeping your opponent dead doesn’t do you any good unless you also score enough points to win the game. Peeling a dead opponent ball is sometimes the key to getting yourself a break. And a good break opportunity takes precedence over defensive play just about every time.
Starting a break from a ball in the jaws of your hoop
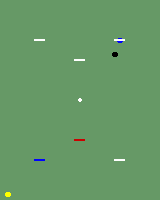
A setup calling for a variation on the swap (see part 1) is pictured below. Blue has broken down at #3, and red, also for #3, has just hit in on black. Red cannot send black towards #4 without leaving a chancy shot back at blue. The solution is to take off to blue and roquet it gently, leaving it in the jaws of the hoop if possible. Then Irish peel blue all the way to #4, while red runs #3. These are all easy strokes, and you have just created an excellent break setup.
|
Diagram 2aRed, for #3, is ball in hand on black. Dilemma: the easiest break for red involves peeling the dead blue ball. Solution: always take the easiest break available, even if it means peeling the opponent. |
This is even easier if red has a wiring lift to blue. Red should take the lift and play the same Irish peel as described above. This is one reason you should wait before clearing deadness after the opponent runs 1-back. If you clear early, you might lose the chance to take a wiring lift. A golden opportunity like this may not come up often, but when it does you want to be able to take advantage of it.
Most players are very unwilling to peel a dead opponent ball, and would make sure to play blue back through the hoop to keep it dead. Many would be satisfied with scoring one hoop, then sending blue to yellow’s hoop to set up a three-ball break for yellow. Others would try to have it both ways, keeping blue dead but carrying on with an awkward break for red. Remember that the usual result of trying to have it both ways is to end up having neither. There are certain configurations of deadness and game time that could make one of those plays the correct choice, but in most cases you will be better off playing the Irish peel and taking the easy break.
Peeling the opponent through 1-back
When the opponent breaks down at 1-back, all sorts of opportunities arise. Don’t hesitate to peel the opponent through 1-back if it will help you to set up a break for either of your balls.
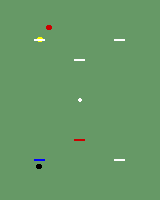
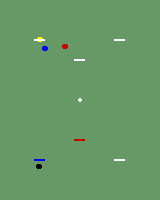
I recently witnessed the situation pictured below. Yellow had stuffed 1-back on a two-ball break, and blue, for #2, has roqueted the red ball. (Black is still for #1 and so is off limits to blue.) Note that blue cannot send red very far toward #3, while still getting a safe roquet on yellow. What blue did was to send red a couple of yards towards #3, then roquet yellow back through the hoop to keep it dead on partner. Blue was lucky enough to make #2 from the reverse take-off, and then faced a very unattractive break setup. Unsurprisingly, blue soon broke down for lack of a good pioneer.
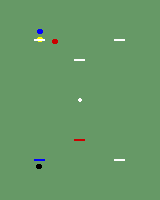
A much better play for blue is to send red about a yard toward #3, then rush-peel yellow through 1-back. Blue clears its deadness, sends yellow to #3, and can now use red to make #2, then continue with a proper three-ball break.
|
Diagram 2bThe setup: Yellow has stuffed 1-back, and blue, for #2, is ball in hand on red. (Black is out of the game.) |
|
Diagram 2cWhat blue actually did: Red has been sent a few yards toward #3, while blue is set to rush yellow back through the hoop. Blue is trying to have it both ways, and will soon break down. |
|
Diagram 2dWhat blue should have done: Red has been sent to a yard or so east of #2 while blue is in position to rush-peel yellow. Peel yellow, take the clearing on blue, then send yellow to #3 to set up a proper three-ball break. |
Whenever you have the chance to peel the opponent through 1-back, first see if you can use the clearance to create an easy break for the striker’s ball. If not, and your partner ball has significant deadness, peel the opponent to clear deadness on your partner ball. While you’re at it, set your partner ball a three-ball break if you can.
Copyright notice
Copyright 2002–2008 by Jeff Soo.
Posted December 1, 2002